5/7/20

Binary Tree Height Exersise

Recently i was at interview and asked following question:
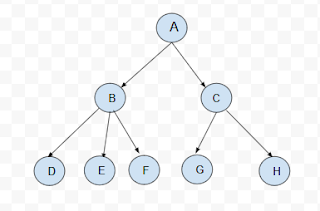
Lest say, there is a binary tree like this:

Write a function which returns a highest level of the tree (in our exmaple is 3)

Solution

Here is a solution i came up with:
My assumption was that node structure has "name" property with node data and "children" with list of pointers to children nodes:


const tree = {
  name: 'a',
  children: [
    {
      name: 'b',
      children: [
        {
          name: 'd',
          children: []
        },
        {
          name: 'e',
          children: [{
               name: 'g',
               children: []
             },{
               name: 'h',
               children: []
             }        
          }]
        }       
      ]
    },
    {
      name: 'c',
      children: [
        {
          name: 'f',
          children: []
        },
        {
          name: 'g',
          children: []
        }        
      ]
    }    
  ]
}
Here is my solution:
I did it iterative way, because recursion can have space complexity issues

 
 function treeHeight(rootnode) {
    let nodes = [rootnode], maxLevel = 1; 
    nodes[0].level = 1;
    // loop through all the nodes
    while(nodes.length) {
       let node = nodes[0]
      
       if (node.children.length) {
         nodes = nodes.concat(node.children.map(ch => {ch.level = node.level + 1; return ch;})); /* if node has children - push them to the end of queue */
       }
       maxLevel = maxLevel < node.level ? node.level : maxLevel;    /* set maxLevel if some node level is bigger;*/
       nodes.shift(); /* remove the first node at each iteration */
    }
  
  	return maxLevel
}

5/5/20

Dont Afraid To Use Webpack

I must admit - im afraid of configuring the webpack by myself.
Im usually use create-react-app or angular-cli or some other boilerplate projects that have webpack configured already...
So the purpose of this post is: to create the simpliest configuration of webpack ever.
But first we need to ask - what is the main purpose of webpack anyway?
According to their site - webpack is module bundler Which means: a tool which concats all javascript modules (or files) into one big file. (that's all).

Experiment number one

Lets install webpack and play a little:

npm i -D webpack webpack-cli

Here is our first the webpack.config.js file:

const path = require('path');

module.exports = {
  entry: './myfile.js',
  output: {
    path: path.resolve(__dirname, 'dist'),
    filename: 'my-first-webpack.bundle.js'
  }
};

At myfile.js lets put some very complicated code:

console.log('Hi@!')

And now lets run npx webpack

You can see that 'my-first-webpack.bundle.js' file created at 'dist' directory (wow!)
Note that it is minified and uglyfied (which is good...)

Experiment 2

Now - to something little more complicate: lets create another file, name it "other.js" and import it from the 'myfile':
other.js


export default Other = () => {
  console.log('Hi@!')
}

Again, run npx webpack
and we got only one 'my-first-webpack.bundle.js' in the dist (and yes it contains 'console.log' statement)

Experiment 3

Ok, you may say, but... how this webpack thing can help me with using some external library like, say React?
The answer is: lets try and see:

npm i react react-dom

Now lets change our myfile.js code to:

import React from 'react';
import ReactDOM from 'react-dom';
const App = () => {
  return React.createElement("div", {}, 'Hi!');
};
ReactDOM.render(React.createElement(App), document.getElementById("root"));

run npx webpack
Now create index file:

<!DOCTYPE html>
<html lang="en">
<head>
    <meta charset="UTF-8">
    <meta name="viewport" content="width=device-width, initial-scale=1.0">
    <title>Document</title>
</head>
<body>
    <div id="root"></div>
    <script src="dist/my-first-webpack.bundle.js"></script>
</body>
</html>

double click it and... whoale!
We can see our React app is running

3/31/20

My Solution Of Rotate-Matrix question

Once i was asked to write a code which, given a matrix "rotates" it in a way that the "rows" become "columns".
For example:

const matrix = [
  [1,2,3],
  [4,5,6],
  [7,8,9]
]

Should become:

const result = [
  [1,4,7],
  [2,5,8],
  [3,6,9]
]

here is y solution for this challenge

function r(mat) {
  return mat.reduce((acc, row, idx) => {
     return [...acc, mat.map(itm => itm[idx])]
  }, [])
}
let res = r(matrix)
console.log({res})

Or it can be written as one row:

const r = mat => mat.reduce((acc, row, idx) => [...acc, mat.map(itm => itm[idx])], [])
let res = r(matrix)
console.log({res})

3/22/20

Non recursive way to write vibonachy sequence

It is very common interview question i see in many places: write a function which receives a serial number as a parameter and returns a fibonacci number.


// num -> 1 => 0
// num -> 2 => 1
// num -> 3 => 1
// num -> 4 => 2
// num -> 5 => 3
Usually i was quickly writing an answer using a recursion:

function f(num) {
  if (num === 0) return 0;
  if (num === 1 || num === 2 || num === 3) return 1;
  return f(num - 1) + f(num - 2);
}
console.log(f(5))

But ,since i found out that recursion has much more space complexity than iterative way, Here is that i come with trying to implement the fibonacci challenge using iterations (of while loop):

function f(num) { 
  if (num === 1)  return 0;
  if (num === 2 || num === 3) return 1;
  let counter = 4; // important to begin from 4, because we already taked care of 1 and 2 and 3 
  let result = 1, old = 1;
  while (counter <= num) {
    let temp = result;
    result = old + result;
    counter++;
    old = temp;    
  }
  return result;
}
let num = 1;
console.log(`${num} => ${f(num)}`)


3/1/20

Bfs

Question i was asked at one of my interviews:
You have a tree structure where each node has one or more leaf nodes (children)
Write a function which will write nodes of each level sorted in alternated order:
For example - given situation like this:

The output should be:
A, C, B, D, E, F, G, H
Note C, B is in reverse order!

My First Try

This question caught me unprepared (as usual).
My first step was to implement a tree structure in javascript (since my language is JS)


const tree = {
  name: 'a',
  children: [
    {
      name: 'b',
      children: [
        {
          name: 'd',
          children: []
        },
        {
          name: 'e',
          children: []
        },
        {
          name: 'f',
          children: []
        }       
      ]
    },
    {
      name: 'c',
      children: [
        {
          name: 'g',
          children: []
        },
        {
          name: 'h',
          children: []
        }        
      ]
    }    
  ]
}


My first idea was to store all the nodes im traversing through at some place outside the function (global variable) And use a recursion to loop through the nodes

const arr = {}
function f(tree, level = 0) {
  arr[level] = [...arr[level] || [], tree.name];
  (level % 2 ? tree.children: tree.children.reverse()).forEach(ch => f(ch, level+1))
}
f(tree)
console.log({arr}) // printing all nodes at the end

More Performant Way

Since i learned (in the hard way) that recursion is less performant than usual loop (and all the things you can do with recursion you can do as well using loop), i came up with following solution:


function f(tree, level = 0) {
   let queue = [], sortOrder = true;
   if (!level) queue.push(tree);
   // traversing through all the nodes of the tree
   while (queue.length) {
     let node = queue[0]; // moving to the next node (which is now the first)
     console.log(node.name); // printing node
     if (node.children.length){
        // populting the queue with current node's children
        queue = [...queue, ...node.children.sort((a,b) => (sortOrder? (a>b?1:-1) :(b>a?1:-1)))];        
     }
     
     sortOrder =! sortOrder;
     queue.shift(); // remove the first node from the queue (BFS, "F" is for first )

   }
   console.log('finished')
}
f(tree)

Note: im using here a "queue" data structure where members is added from one side and coming from other (FIFO)

2/5/20

Generators OR Interesting question i was asked at some interview

Question

Recently im going a lot to various interviews. So here is one interesting question i was asked:
Can you write the "adder" function that can be called multiple times and return sum of all numbers passed so far?
Example:
adder(1) // 1
adder(4) // 5
adder(2) // 7
Yes i answered, it is easy:


let store = 0;
function adder(num) {
  return store += num;
}
console.log(adder(1)) // 1
console.log(adder(6)) // 7

But interviewer asked:
And will it be possible not to use outer scope variables? (And i understood that answer is Yes)
Im not good at interviews in general, so the answer i finally got with, was:

let adder = (() => {
  let store = 0;
  return num  => store += num;
})()
console.log(adder(1)) // 1
console.log(adder(6)) // 7

Which is pretty much the same idea only the "store" is store inside the "Adder" function (actually it is more resembles the object with property to me)

Generators

After the interview (and actually even after i received a reject from this place) i had a sudden thought:what about generators - can they help me is such a problem?
What is generator?
according to the MDN site: Generators are functions which can be exited and later re-entered. Their context (variable bindings) will be saved across re-entrances.
Which sounds exactly what is needed in my case, right?
After playing around i come with following code:


function* adder() {
 let i = 0
 while(true)  {
  i += yield i;
 }
}

const gen = adder();
gen.next()
console.log(gen.next(1).value);  // 1
console.log(gen.next(2).value);  // 3
console.log(gen.next(3).value);  // 6

Which is pretty much doing the same thing, only it has very different and complicated syntax...

Conclusion

In this post i tried to show how to build a function with a "state" (statefull). I solved a problem by using a closure;
Also i asked myself if generators can be helpfull here, and although the answer was not so clear, it was yet interesting to play with generators

2/1/20

My Implementation of Javascript "Bind"

Recently i was asked on some interview to implement "bind". So i think i will make a post dedicated to bind implementation.

What is a purpose of "bind" anyway?

Well, everybody knows that when you use a javascript you must use "this" keyword very carefully. In some cases - "this" (which called also execute context) can seem to "loose" its original meaning and have some unexpected value instead...

Example

Lets say you have a "Person" object in your code:


function Person(name) {
  this.name = name;
}
Person.prototype.showName = function() {
  console.log(this.name);
}

let person = new Person('Chubaka')
person.showName();
// will print "Chubaka" as expected

Simple and clear...
But!
What will happen if we will try to execute this method in response of some event, say clicking on document?

function Person(name) {
  this.name = name;
}
Person.prototype.showName = function() {
  console.log(this.name);
}

let person = new Person('Chubaka')
document.onclick = person.showName;
// will print "undefined" (WHYYYY???)

Why? because "this"(inside showName function) is no more populated with "person" object.
Instead (if we will try to debug and look closer at this "this") - we will find that like any event - the this now populated with the target of event(which is document)
This is where "bind" might be helpfull:
It attaches the context to function for the future execution:

let person = new Person('Chubaka')
document.onclick = person.showName.bind(person);
// will print "Chubaka" again

Implementation

Here is my implementation of bind (i called it "mybind")


  Function.prototype.mybind = function (context) {
    const that = this;// 'this' here is instance of "function" object
    return function() {// this function will be called in response to "click" event
      that.call(context)  // here the context will be passed           
    }
  }

Do we still Need "bind" in the era of ES6?

My answer is - No
Here is why:
You can write the same functionality using modern ES6 syntax:


  class Person {
    constructor(name) {
      this.name = name;
      this.showName = () => {
        console.log(this.name);
      }
    }
  }

let person = new Person('Chubaka')
document.onclick = person.showName; 
// chubaka is here again 
// (and no 'bind' needed)

See you in the next article!

1/15/20

Building shopping cart using angular8

Hi everybody!

This is my first 2020 post!
In this post i decided to show you how quickly you can build a shopping cart app using latest Angular8 and using as less code as possible...
Also
I will touch some interesting (at my point of view) consepts during this tutorial, like:

  1. Importace of plannig
  2. Which IDE is better
  3. One way data flow phylosophy
  4. Grid CSS
  5. reduce by example
So, lets start!

Planning

Of course before starting actually coding you need to have a clear picture in your mind of: how exactly the thing you want to build should look and how it should behave. Better way is to take a pencil and paper and draw a quick sketch. So here a wireframe i have drawn:

as you can see - the design consist of two columns: left one is product list and the right column - is the shopping cart itself.
  • Pressing on each one of product`s 'plus' button - will make the product appear inside shopping cart.
  • Each product instance at shopping cart has a "quantity" field where you can see how much units of this product is ordered, you can increase/decrease units number by pressing "up" or "down" arrows (you can as well press 'plus' button at some product at "product list" one more time to increase the units number)
  • If number of units is 0 - the product should no more appear in the shopping cart.

Starting to Code (Or, more correctly - where i start to coding)

For this post i will not use any traditional IDE like webstorm or vscode. Instead i will use online stackblitz editor.
Why? you may ask

  • Because you dont need to download & install anything on your machine
  • Because you dont need to wait until dependencies installed(at least at my comp the installing deps is more more slower then in stackblitz)
  • Because the future is to have all you need online (and we want to be a future guys, are we?)
  • Because it is how i will place a running demo in this post
Anougth reasons?

Start coding already!!!

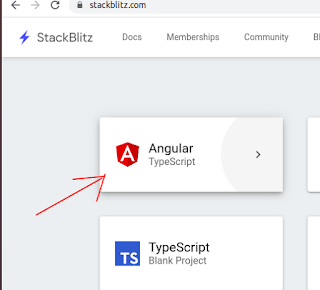
Ok, lets start a new angular Project.

Now you have an Angular8 project in less than a second. Pretty fast, right?
(Try to do it using ng new my-project and see how much time is takes...)
Here we have already a "hello" component, lets rename it to ProductListComponent
Remember to Modify the code of app.module.ts file accordingly:

import { AppComponent } from './app.component';
// replace "hello"
import { ProductListComponent } from './product-list.component';

@NgModule({
  imports:      [ BrowserModule, FormsModule ],
  declarations: [ AppComponent, ProductListComponent/*also here*/ ],
  bootstrap:    [ AppComponent ]
})
export class AppModule { }

Lets now go to ProductList component code and do some modifications:
1. rename the "name" input by "products"
2. change "selector" property to "product-list"
3. change markup at app.component.html to use "product-list" instead of "hello"

import { Component, Input } from '@angular/core';
@Component({
  selector: 'product-list',
  template: `
  <h1>Products List</h1>
  <div *ngFor="let product of products">{{product.name}}<div>
  `,
  styles: [`:host{border: 1px solid #000;}`]
})
export class ProductListComponent  {
  @Input() products: any[];
}

Now go to app.component.ts and lets create two public properties:
lists: productList and cartPorductList:


export class AppComponent  {
 productList = [
   {name: 'Z900', price: 8799},
   {name: 'shubert helmet', price: 999},
   {name: 'sport gloves', price: 99}
  ];
 cartProductList = [];
}

Low lets bind our newly baked ProductListComponent to show the products (at app.component.html):

 <product-list [products]="productList"></product-list>

by now the "output" screen of stackblitz editor (which you dont have in any not-online IDEs) should look like this:

Shopping Cart

In a same way we have created "PorductList" component - we will create now a "ShoppingCart" component. Just copy the "product-list.component.ts" and modify it accordingly:


@Component({
  selector: 'shopping-cart',
  template: `
   <h1>Shopping Cart</h1>
  <div *ngFor="let product of products">{{product.name}}<div>
  `,
  styles: [`:host{border: 1px solid #000;}`]
})
export class ShoppingCartComponent  {
  @Input() products: any[];
}

Note, the code is almost the same, the same "products" input, only names changed...
(Dont forget to register this component at app.module file too!)

Side By Side

Now we should make both - ShoppingCart and ProductList components to located side by side at parent (AppComponent) template.
There is a lot of various ways to implement this layout, and i will choose what i consider a most advanced and convenient way - the css-grid of CSS3 layout system:
Just place the following css code in app.component.css file and you done:


:host {
  display: grid;
  grid-template-columns: 1fr 1fr;
  grid-column-gap: 10px;
}

You not have to add anything to child component styles and layout should look now like this:
TADAM!!!
If you new to grid-css feel free to read more here about grid-css techniques

Product Component

We may place the name price and "+" button at ProductList component template as well, but, i think - it will be more readble to place the markup and the logic into its own encapsulated component - the ProductComponent.
Lets create and register it again the same way we did with previous two components:


import { Component, Input } from '@angular/core';

@Component({
  selector: 'product',
  template: `
  <div>{{product.name}}/<div><button>+</button>
  <div>{{product.price}}/<div>
  `,
  styles: [`:host{border: 1px solid blue;}]`]
})
export class ProductComponent  {
  @Input() product: any;
}
// also lets modify the template of parent "ProductList" to use "product"
 <poduct *ngFor="let product of products" [product]="product">
 </product>
Now, remember the nice sketch i have show you at the begining?(i guess - you remember...)
Now look at the output...
What a mess!!!
But, lets use the same grid-css trick here! (just copy from app.component.css, paste to product.component.ts at "styles" section) and change the second "1fr" to "auto":

styles:[`
:host {
  display: grid;
  grid-template-columns: 1fr auto;// change the second "1fr" to "auto"
  grid-column-gap: 10px;
}
div:nth-child(1) {font-weight: bold;}
`]


And look: the things magically jumped right into their places!
Note that even "price" section moved to the bottom row because "1fr 1fr" means - the first 2 elements should caught all the available space at the row, and the next elements will be pushed to the next lower row, cool huh? css-grid rules!!!
One lust little thing:
Lets prettify the way the price displayed using cool "toLocaleString" es6 feature:

  <div>{{product.price.toLocaleString('en-US', {style: 'currency', currency: 'USD'})}}</div>
Now look at the improvements:
Much much better!

One way data flow

Lets talk a little bit about architecture. Currently our component structure is a tree, where "app" component uses as a root of the tree, its children is products and shopping cart and each of them should have its own children:

Currently the data is passed from parent to its children and grandchildren(as the red arrows show). Now the logic of '+' button should add products to "shoppingCartList" array which is property of its grandfather
(app component) - and i decided it will implement the same one-way data flow, only to the opposite direction(child -> parent -> grandparent).
We will use for this the Output & EventEmitter features of angular:
Lets add following code to product component

export class ProductComponent  {
  @Input() product: any;
  @Output() productAdded = new EventEmitter();
  addProductToCart(product) {
    this.productAdded.emit(product);
  }
}
// Also lets modify the template of product component by adding the clickHandler:
  <div>{{product.name}}</div><button (click)="addProductToCart(product)">+</button>
In the same way we need to add "addProductToCart" method, "productAdded" output and set its value with EventEmitter also to ProductList component (it will use now something like proxy between child Product and parent App components)

export class ProductListComponent  {
  @Input() products: any[];
  @Output() productAdded = new EventEmitter();
  addProductToCart(product) {
    this.productAdded.emit(product);
  }
}
// also update template:
  <product *ngFor="let product of products" [product]="product" (productAdded)="addProductToCart($event)"></product>
Now, the App component will be able to respond to "productAdded" event:
app.component.ts:

...
 addProductToCart(product) {
   this.cartProductList.push(product);
 }
// template:
<product-list (productAdded)="addProductToCart($event)" [products]="productList"></product-list>
We can see now products updated at ShoppingCart component:
We pretty close now to our final goal...

How about use Service?

Yes, it is good you asked. Actually, angular gives you ability to make data accessible to all level of components by using services. This is alternative architectural approach, and each one has its advantages and disadvantages.
One of advantages of one-way-flow is - that is very clear who triggers the change detection (a mechanism which responses to data changes), Also - if we would use services - how would i blabber about one-way-flow to you?

Good exmple for usage of "reduce" array method

Shopping Cart list is different from a product list, because same product may be added multiple times, but it should be displayed only once, and display the quantity of items (times '+' button clicked)
Thus: we must change a logic of "addProductToCard" method of AppComponent:
Istead just pushing product to "shoppingCartList" we will push it only if product NOT exists there yet
If product already exsit we will update "num" field of this product:


 addProductToCart(product) {
   const productExistInCart = this.cartProductList.find(({name}) => name === product.name); // find product by name
   if (!productExistInCart) {
     this.cartProductList.push({...product, num:1}); // enhance "porduct" opject with "num" property
     return;
   }
   productExistInCart.num += 1;
 }
but now we must change the ShoppingChart component header, so it will correctly display the total products number of order. For this we will use "reduce" method of array:

<h1>Shopping Cart ({{total()}})</h1>
// code
export class ShoppingCartComponent  {
  @Input() products: any[];
  total() {
    return this.products.reduce((acc, prod) => acc+= prod.num ,0)
  }
}

CartProduct Component

Lets quickly create the cartPorductComponent - it is almost similar to productComponent in its basics (its has 'product' Input too).


export class CartProductComponent  {
  @Input() product: any;
}
The main difference here is "quantity" input. Here is there the interesting things begin.
First: lets bind it to 'num' property of 'cartProduct' object, we will use angular [(ngModel)] directive

   <div *ngIf="product">
     <div>{{product.name}}</div>
     <input type="number" [(ngModel)]="product.num" min="0"/>
   </div>
Lets try to add some product from the list and see what we get:
Click the "Up" and "down" buttons and see that "total" quantity get updated
Very close to finish.
Now for the last step:
What should happen when quantity is reduced to zero?
Right, product should removed from "cart".
Lets add "ngModelChange" directive to "quantity" input :

<input type="number" [(ngModel)]="product.num" min="0" (ngModelChange)="modelChanged($event)"/>
and "modelChanged" handler at cart-product component

  modelChanged($event) {
    if (this.product.num === 0) {
      this.removeFromCart.emit(this.product)
    }
  }
Because of "one-way-data-flow" architecture we using here, we must update parent components as well:
shopping-cart.compontnet:

//template:
(productRemoved)="removeProduct($event)"
//code:
  @Input() products: any[];
  @Output() productRemoved = new EventEmitter();
  calcTotal() {
    return this.products.reduce((acc, prod) => acc+= prod.num ,0)
  }
  removeProduct(product) {
    this.productRemoved.emit(product)
  }
 
And finally, at app.component - the remove-from-cart logic:

  removeProduct(product) {
   this.cartProductList = this.cartProductList.filter(({name}) => name !== product.name)
  }
Now when reducing product quantity to 0 makes product to be removed from the cart.

Full Code

Getting started with docker

It is very simple to get started usig docker. All you need to do-is download the docker desktop for your system Once you get docker syste...